Azure Migrate Appliance Installation
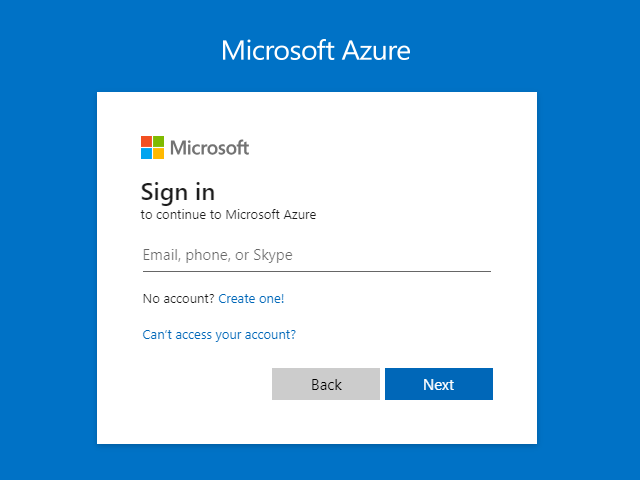
Start by logging into the Azure Portal.
The client should have a CSP Subscription where the Azure Migration project can be created. However, you can create an Azure Migrate assessment using any working Azure subscription. The portal can be reached in a web browser at portal.azure.com

Navigate to Azure Migrate
You can find the Azure Migrate section of the portal by typing it into the search box at the top of the screen.
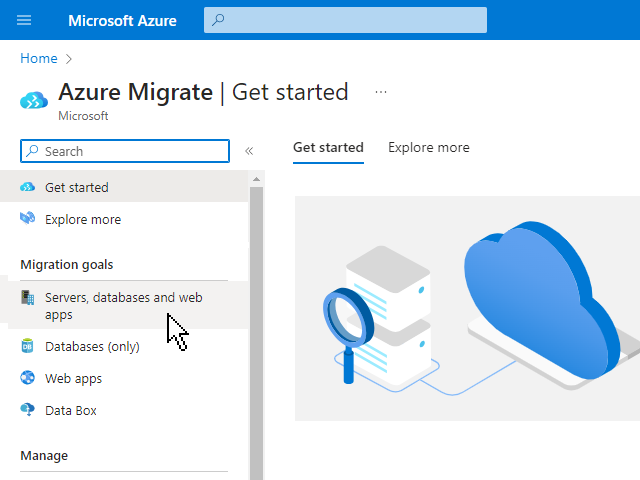
Select Servers, databases, and web apps
Navigate to the Servers, databases, and web apps section on the left-hand blade menu under Migration goals.
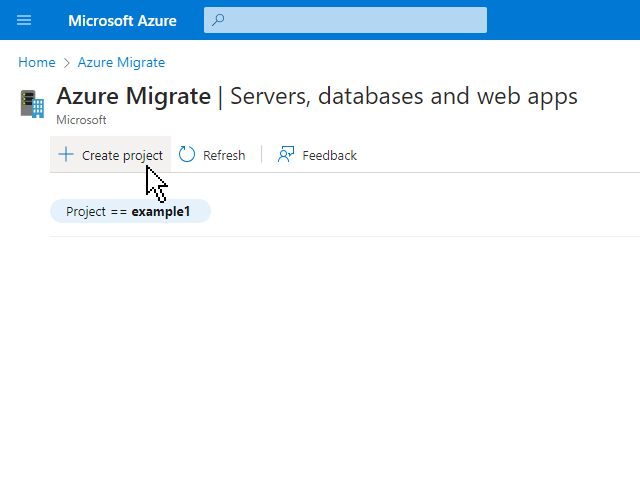
Create a new project
On the top of the screen, select the Create project button. If you've already created a project, you'll see a project selection button below.
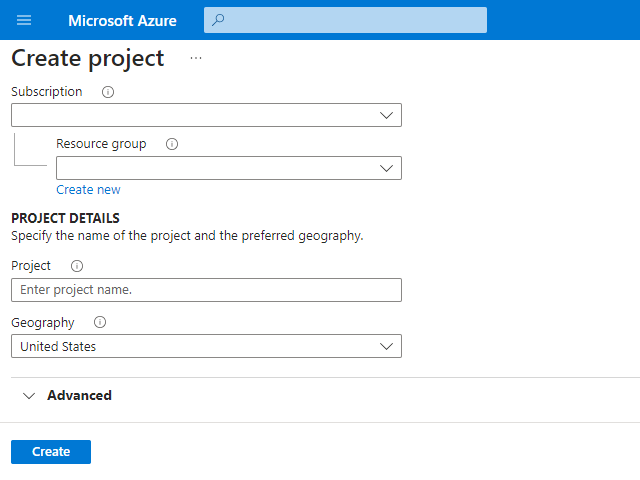
Create project details
Specify the Subscription and Resource Group where you'd like to keep the Azure Migrate project resource. Note the region where this project is created is determined by the Resource Group. Migration Project resources cannot be moved.
Assign a name for your Migrate Project then select your corresponding Geography.
Advanced options allows the migration process to utilize Private Endpoints which adds additional layers of security.
Select Create.
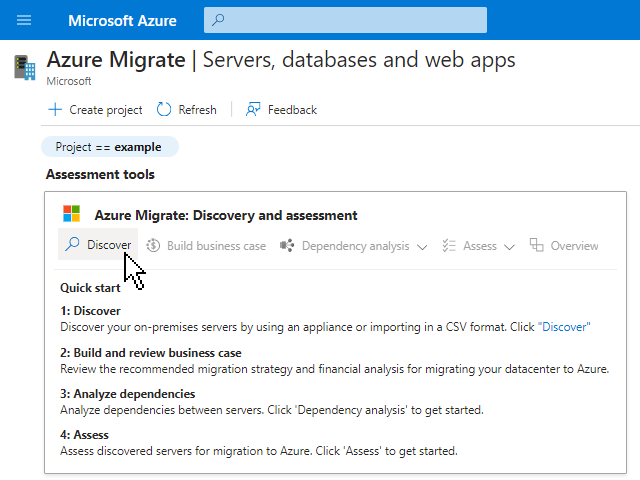
Select Discover
Once the project is created, two panels will appear on screen: Assessment tools and Migration tools. Select the Discover button under Assessment tools.
An Azure Migration Project consists of two major sections: Discovery and Assessment followed by Replication and Migration. While it is advised to perform both activities, they can be performed independently of each other.
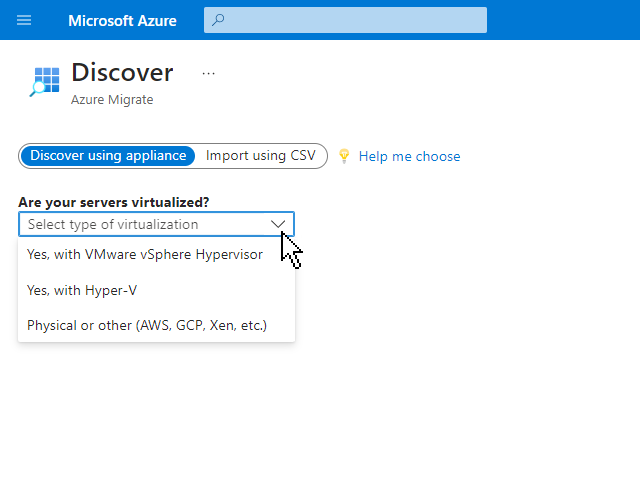
Select Server type
Azure Migrate supports options for Hyper-V, VMware, Physical Servers, and other Cloud environments. Select the option that applies to your environment.
The screenshots in this document depict installation of the Azure Migrate Appliance into a Hyper-V environment. While some details will change depending on each unique environment, the principle steps are the same.
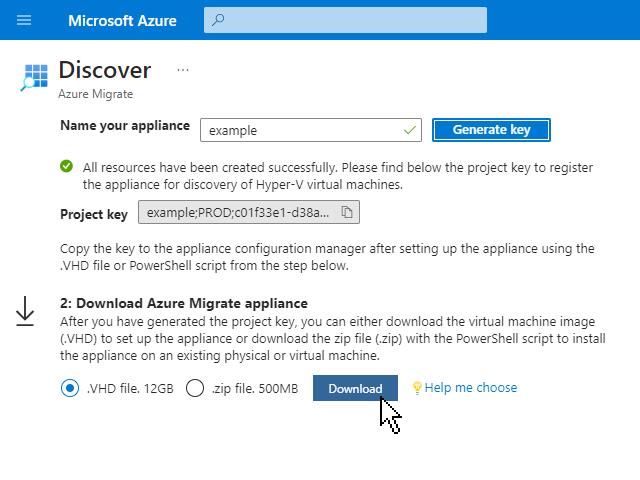
Generate a Project Key and Download the Azure Migrate Appliance
Generate a Project Key by naming the appliance and selecting the Generate Key button. This process will take roughly 2 minutes. Once the key is generated, copy it to your clipboard.
From this screen, you can download the Azure Migrate Appliance. For Hyper-V, a VHD file will be available. An OVA file is available for VMware environments. A third option is a ZIP file available for physical server and other cloud environments. The ZIP option will require creation of a Virtual Machine and procurement of a Windows Server operating system.
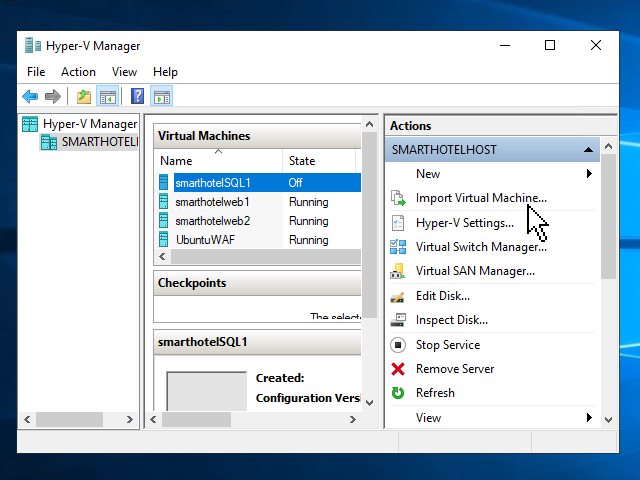
Install the Azure Migrate Appliance on-prem
From the Hyper-V Manager, select Import Virtual Machine...
In a Hyper-V environment, the Azure Migrate Appliance will right-size itself. You'll be required to select Memory and Storage settings in a VMware envionrment.
Cycle through the installation process then launch the Azure Migrate Appliance.
Appliance Configuration Manager
The Azure Migrate Appliance will take a few minutes to launch for the first time. You'll be required to setup a Windows username and password.
After a few minutes, a web browser will launch. This is a local web interface called the Appliance Configuration Manager which is used for configuring the Azure Migrate Appliance.
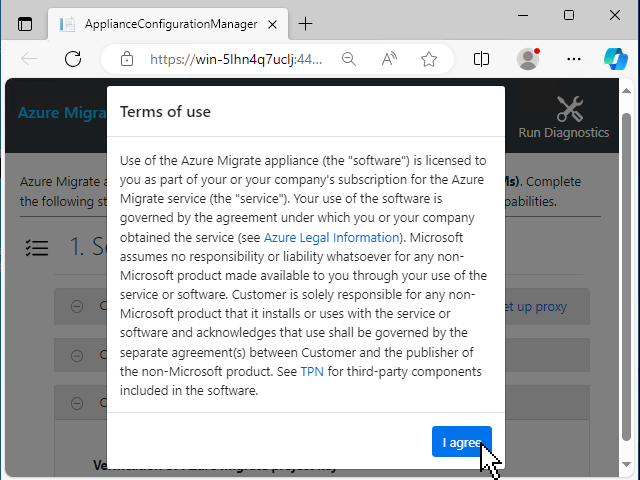
Agree to the Terms of use.
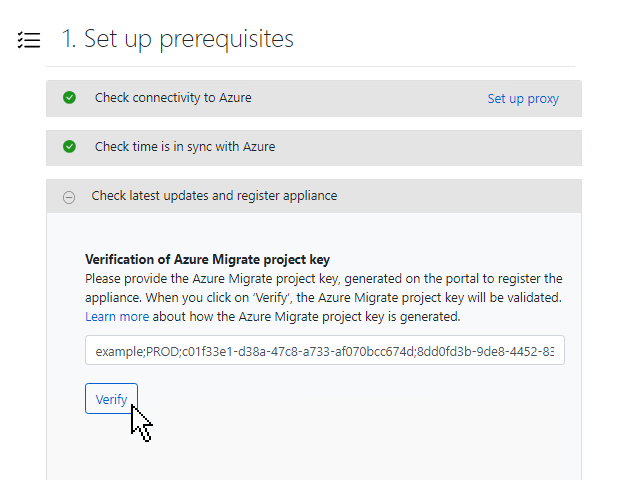
Setup Prerequisites
The Appliance will check internet connectivity to Microsoft.
Paste the Project Key from the clipboard into the prompt then select the Verify button. After verification, the Appliance Configuration Manager will check for updates.
Note: I've occasionally seen the windows.net server become temporarily unavailable which causes the Check connectivity to Azure process to fail. Verify your Virtual Machine has access to the internet.
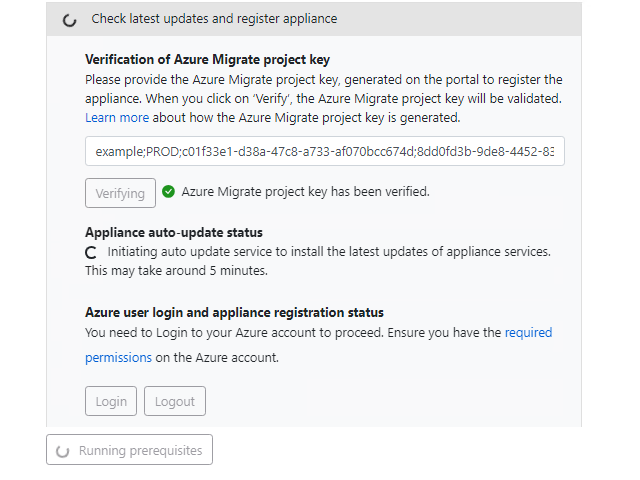
Check latest updates...
The Appliance Configuration Manager page will reload will spend about 5 minutes checking for updates.
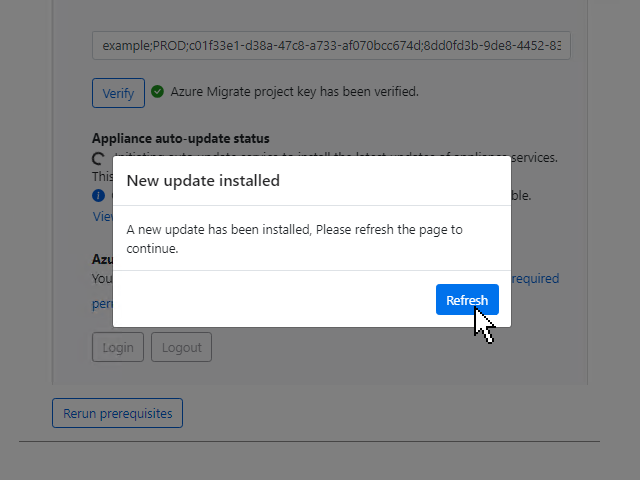
Check latest updates...
After updating, the Appliance Configuration Manager page will reload. You'll need to repeat the process by pasting the Project Key again, select Verify, then wait for the Appliance Configuration Manager to check for updates. After checking for updates, it will allow you to proceed to the next steps below.
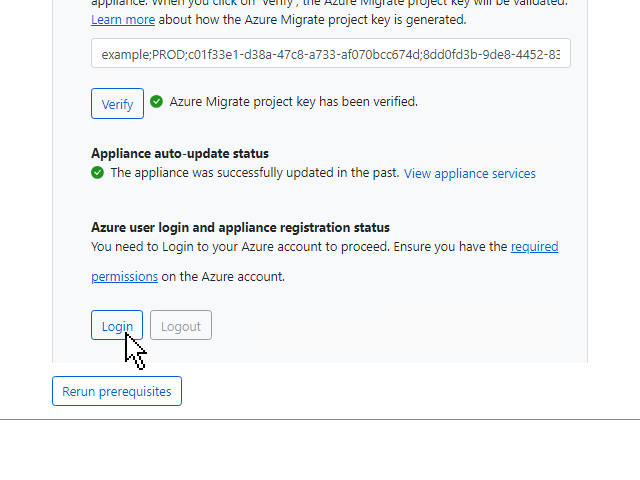
Login to Azure
After several minutes, you'll have the option to Login to Azure.
Select Login.
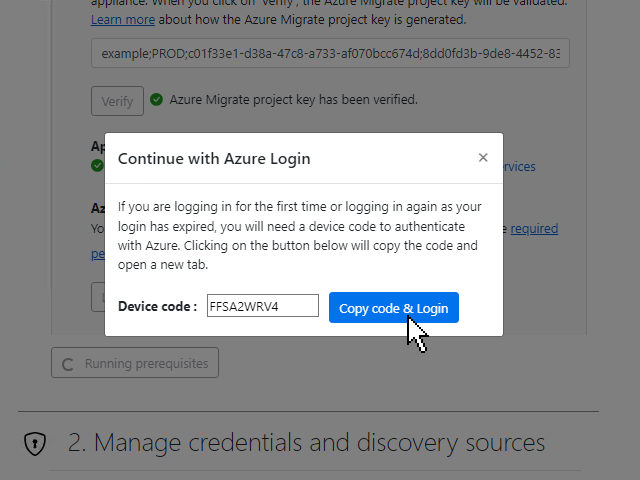
Copy Code & Login
Select the Copy code & Login button. This will automatically copy the on-screen code into your clipboard. No need to save it as you will only need it once.
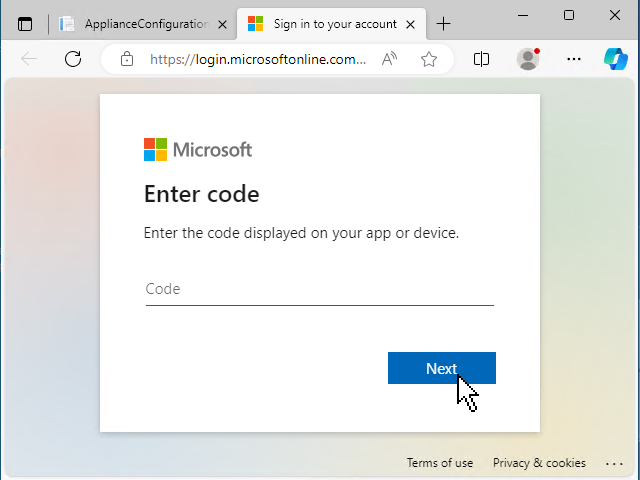
Paste Code
Paste the Device code in the prompt then select Next.
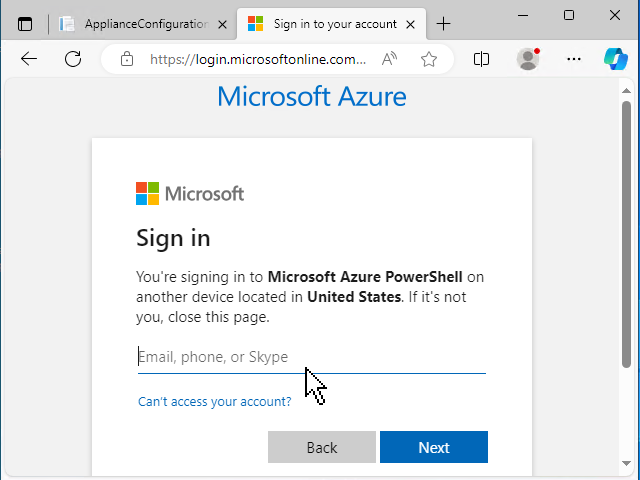
Sign in to Azure
Login to Azure using your username and password.
The required RBAC is either Owner or Contributor on the corresponding subscription.
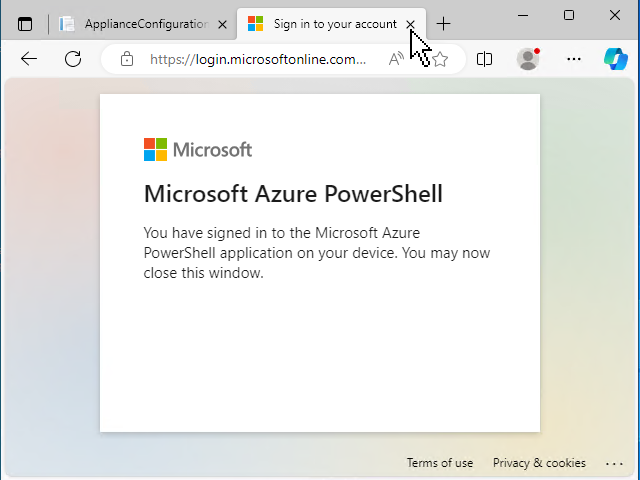
Close the PowerShell tab
The Azure Migrate Appliance Configuration Manager is now signed into Azure. Although the prompt instructs you to close the window, don't. Close the web browser tab. You'll want to return to the Appliance Configuration Manager which is in the first tab.
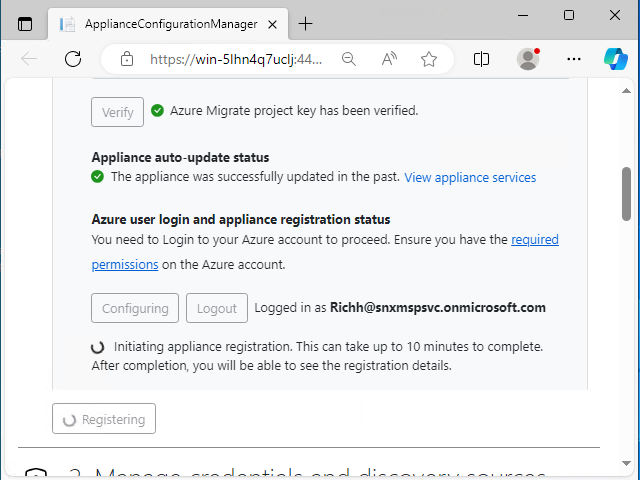
Initiating Appliance Registration
After signing into Azure PowerShell, the Appliance Configuration Manager will take several minutes to configure the registration. Upon completion, you may proceed to the next steps below.
Note: If your username has access into multiple Azure Tenants, make sure you are cached into the correct tenant.
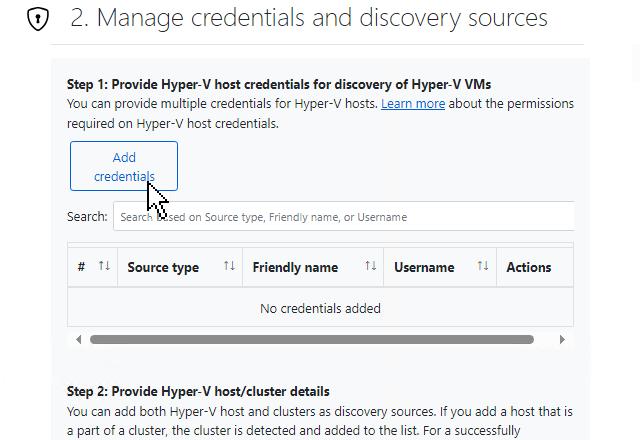
Manage Credentials and Discovery Sources
Scroll down and select the Add Credentials button. This is where you can securely enter login credentials for your Hypervisor servers in the Appliance Configuration Manager.

Add Credentials
The Source Type option will be limited to the Hypervisor option chosen earlier. In this example, the menu is displayed as Hyper-V Host/Cluster and cannot be changed.
Enter a Friendly Name which is an internal index to help identify each set of credentials. You can use a name such as "Hostlogin1" or whichever naming convention you like. This option is completely up to you.
Enter the username and password. Make sure you don't enter any typos. Then press the Save button.
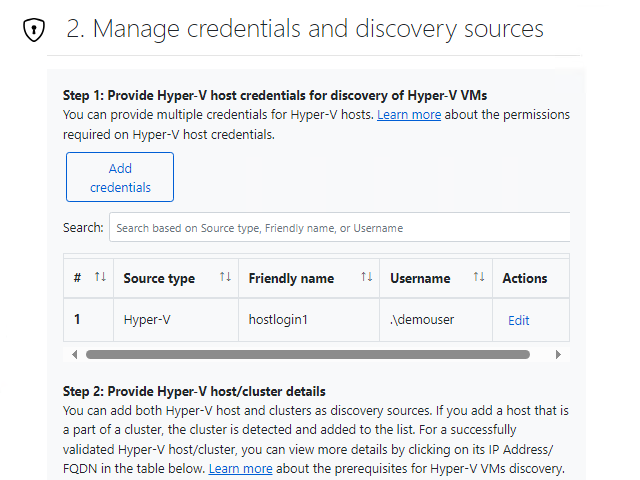
Add Credentials Continued
You'll see the credentials have been added. Assign more credentials as needed if connecting to multiple Hypervisor servers assigning each set of credentials to a unique Friendly Name.
This will work with both domain-joined and local usernames.
Note: In case of troubleshooting, check the username and password entries first as I've seen the UI glitch and cut the passwords short on several occasions. Simply re-enter them and verify accuracy if this is the case.
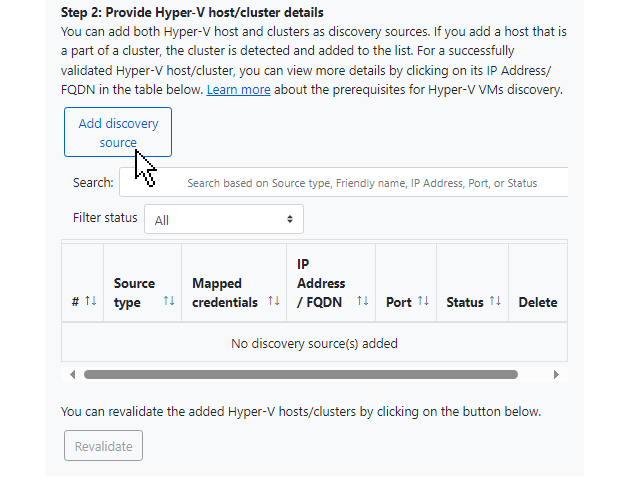
Add Discovery Source
Scroll down and select the Add Discovery Source button under Step 2. This is where the Appliance Configuration Manager lists the IP Addresses or FQDN to connect to local Hypervisor Servers using the stored credentials.
This step relies on a number of background services. Ensure these services are running and allowed on the network.
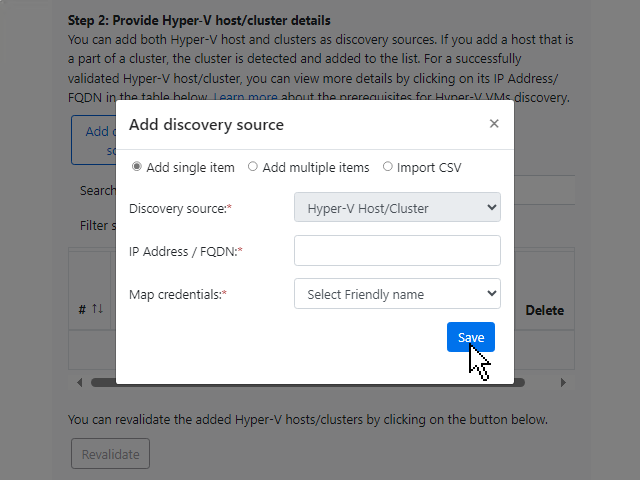
Add Discovery Source Continued
Select Add Single Item on the top-left of the prompt.
Enter the local IP Address or FQDN of the Hypervisor Server.
Select the corresponding Friendly Name of the Credentials for the Hypervisor Server.
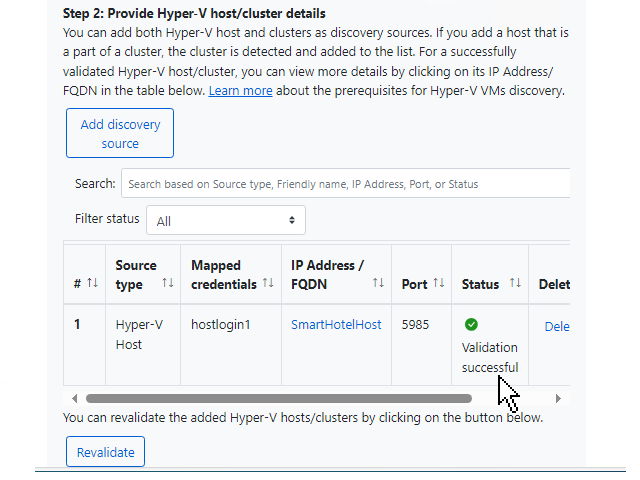
Validation Successful
Check if the Validation was successful. If so, scroll down to the bottom of the Appliance Configuration Manager page.
In the event of troubleshooting, first check the usernames and passwords stored in the previous step above. Connectivity between the Azure Migrate Appliance and Hypervisor Server depend on multiple services running and being allowed through the network.
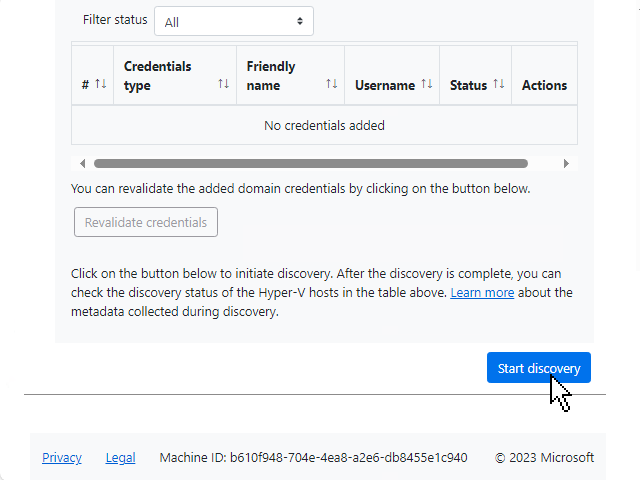
Start Discovery
Scroll down to the bottom of the Appliance Configuration Manager page and select Start Discovery.
Note: There are optional steps for performing Software Inventory which won't be covered in this document.
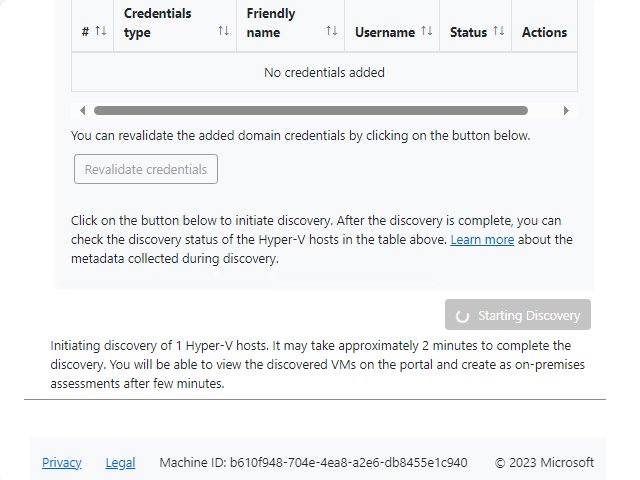
Starting Discovery
The Discovery process will take several minutes depending on the size of the environment.
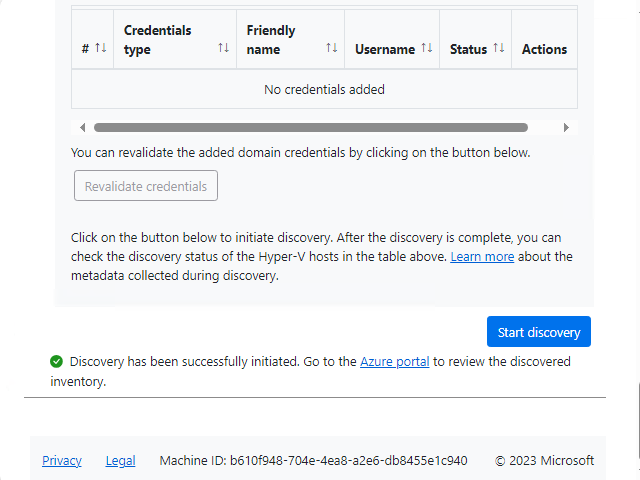
Discovery Successfully Initiated
When the Discovery process is completed, you may close your connection to the Azure Migrate Appliance virtual machine. Keep this machine running as it will be continuously gathering performance metrics from the Hypervisor environment.
Proceed back to the Azure Portal.
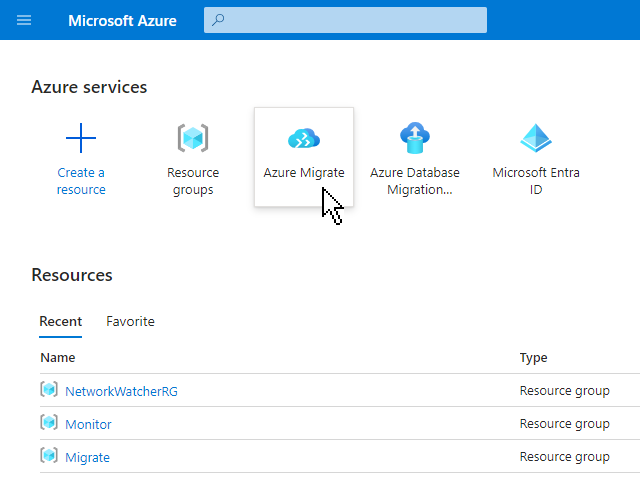
Navigate back to Azure Migrate
Navigate back to the Azure Migrate section of the Portal.

Servers, Databases, and Web Apps
Select Servers, Databases, and Web Apps in the blade menu under Migration Goals on the left-hand side.
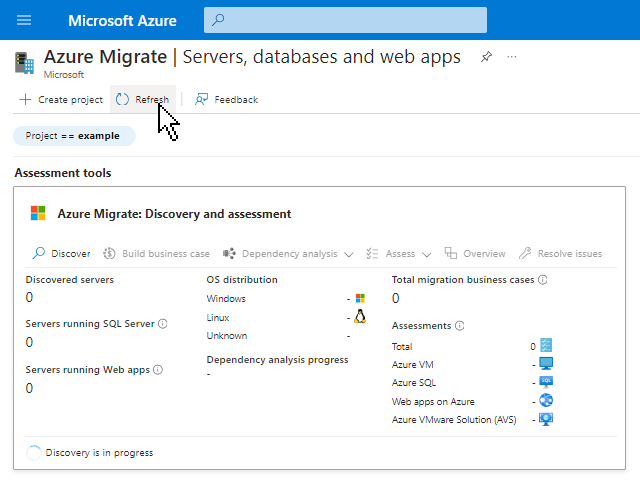
Refresh the Project
Press the Refresh button near the top of the page. This will take about 12-15 seconds. The number of Discovered Servers should propagate. Now that on-prem Virtual Machine metrics are being sent to the Azure Migrate project, we can create an assessment.
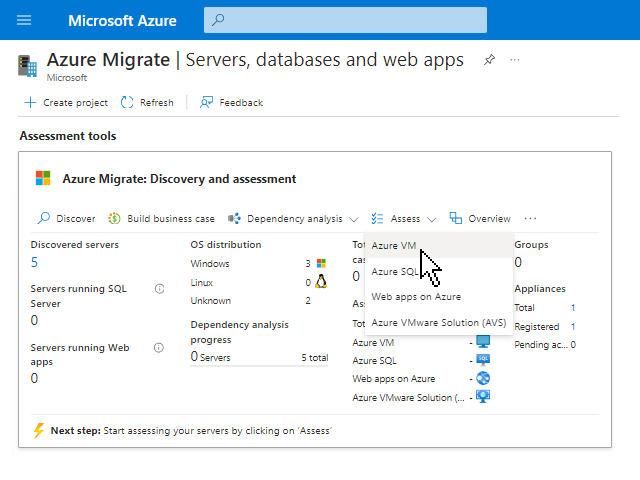
Create an Assessment
To create an Assessment, select Assess at the top of the Assessment Tools panel then select Azure VM.
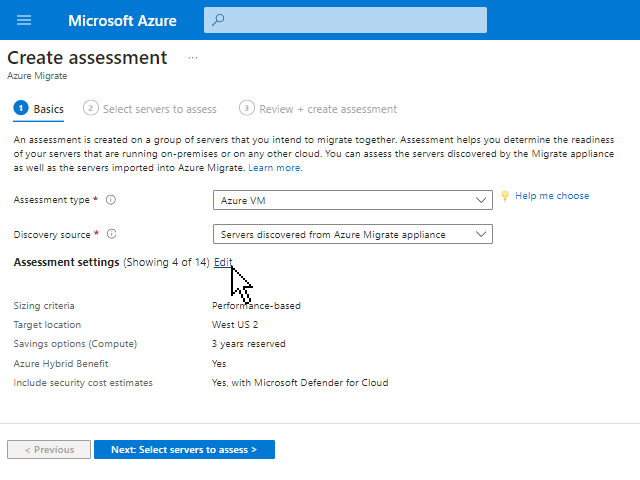
Edit Assessment Settings
Assessment Type should remain Azure VM. The Discovery Source is Servers discovered from Azure Migrate Appliance.
Select the Edit button beside Assessment Settings. In the following section, you can adjust all the parameters of your assessment.
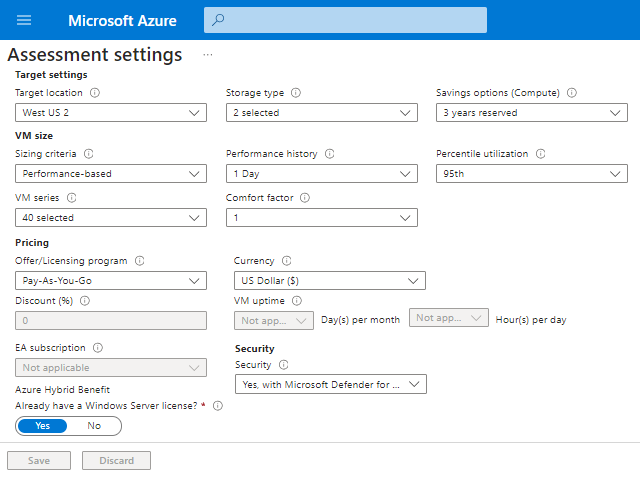
Assessment Settings
This page is perhaps the most important piece of setting up your Azure Migrate Assessment. Adjust the parameters to your liking then select the Save button on the bottom of the page.
A detailed explanation for each setting will be available soon.
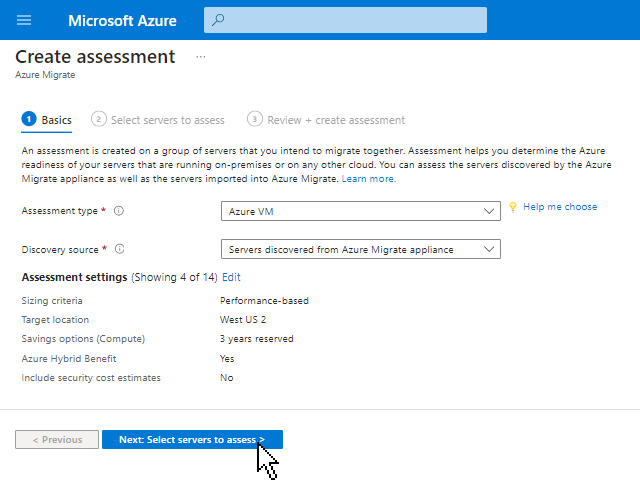
Next: Select Servers to Assess
Select the button that reads Next: Select Servers to Assess on the bottom of the page.

Select Servers to Assess
Here you can name your assessment.
You can create a logical grouping of discovered servers. Simply select Create New and give the Group a name. This can be useful in situations where you can create smaller batches of of servers in large environments. This allows you to pick and choose which servers to assess.
After you've selected your servers to add to the group, select Next: Review + Create Assessment
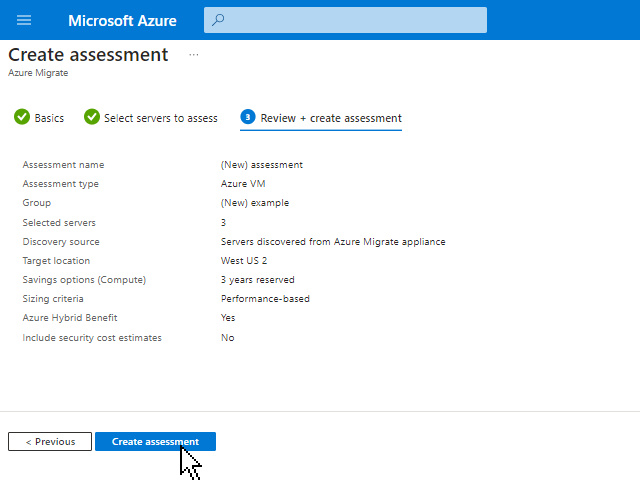
Create Assessment
Verify the Assessment settings look to be correct then select Create Assessment on the bottom of the screen.
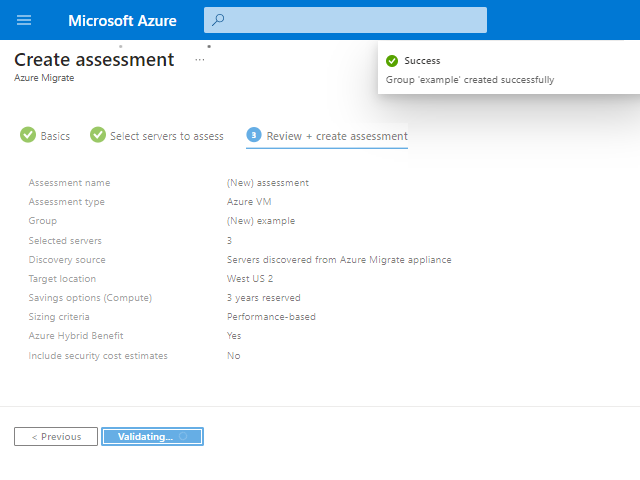
Validating...
The Azure Portal will present a loading screen.
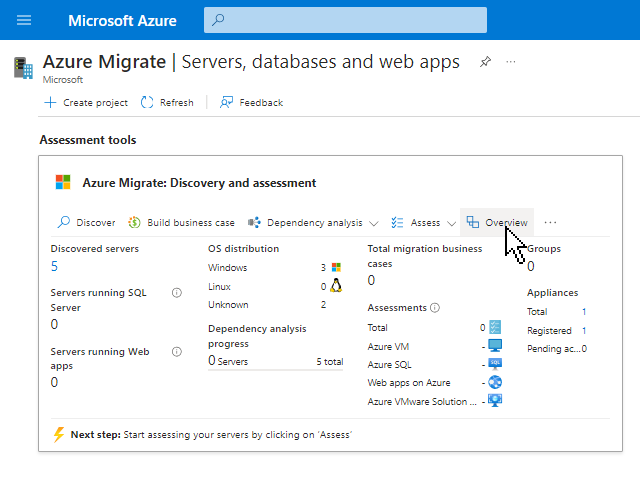
Overview
When the creation of the Assessment has been completed, you'll be taken back to the Servers, Databases, and Web Apps page. Select the Overview button on the top-right of the Assessment Tools panel.
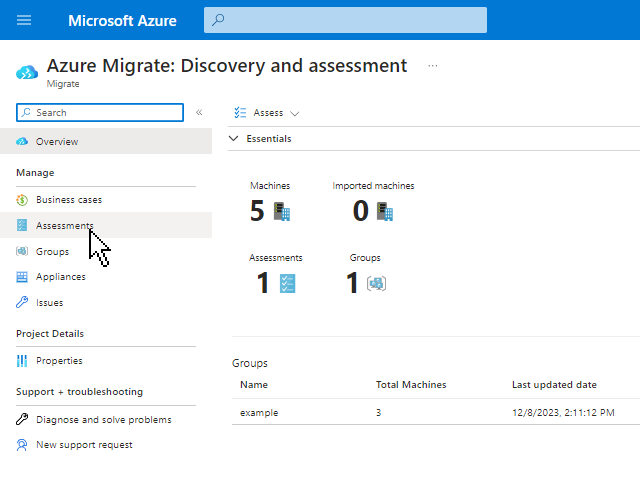
Azure Migrate: Discovery and Assessment
From this page, select the Assessments option on the blade menu.
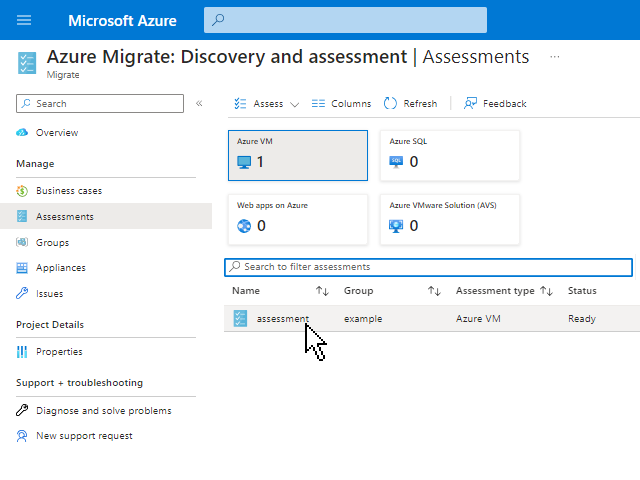
Assessments
The newly-created Assessment should be listed. Select it.
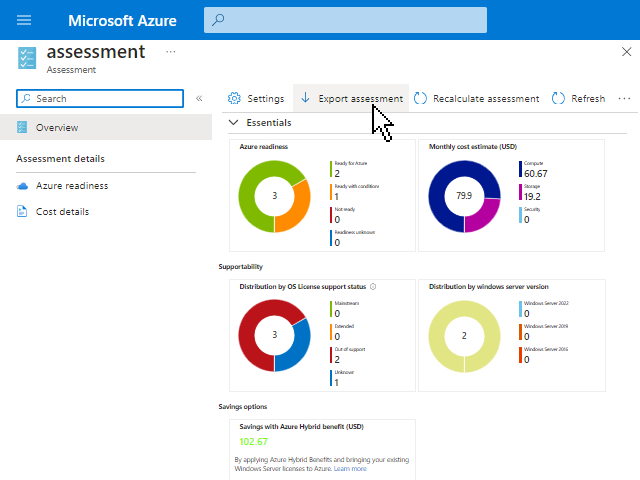
The Assessment
Assessment details will be available in the Azure Portal. You may export the Azure Migrate Assessment into Excel by selecting Export Assessment.
Document prepared by Richard Hartman